
How to Build Your Own Custom Playbill Program With the All-New Playbillder
Our newly re-designed online tool makes it easier than ever to make authentic and authorized Broadway-quality Playbill programs.
By Bryan Campione


Have you ever wanted to make your own Playbill program for a local production or event? Whether you’re building a full professional program for a high school or community theatre show or just making a fun program for an especially theatrical wedding or birthday party, Playbillder makes creating authentic Broadway-quality Playbill programs easy and fast.
Even better news: we just launched an all-new version of Playbillder which lots of new features making building programs even easier and more customizable. Using the steps below, you’ll have your own custom Playbill program built and ready to print in no time flat.
To watch our "How To" Video, click the link below. If you would like to read our detailed Step-By-Step Guide, scroll below.
Step 1: Find a Show
One of Playbillder's newest features is there for you before you've even started building your program. Head to Playbillder.com and click "Find Your Next Show" at the top of the page to find a unified database of the plays and musicals at all of the major licensing companies. No longer do you need to look through the separate catalogues of each licensor to find who represents the title you want to produce. We've got it all ready for you with a searchable platform that doesn't even require signing into an account. Scroll through the list, or use the search bar to find a specific title.
Step 2: Sign In, or create an account
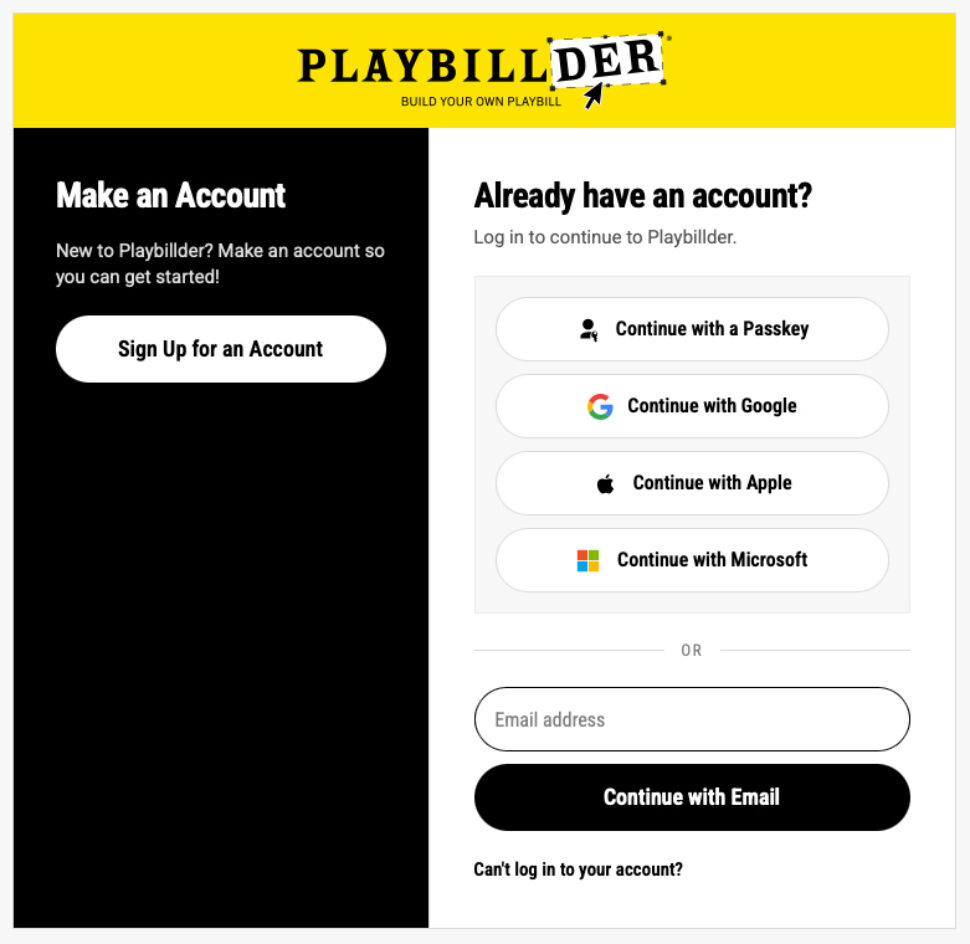
If you haven’t already created an account at Playbillder.com, you’ll need to register first. We just need your name, email address, and a few other details and you’ll be ready to go. If you already have a login—including those of you who have used the original version of Playbillder—your email address and password will still work. If you've forgotten your password, no worries—just click "Can't log in to your account?" to begin the password reset process.
Step 3: Create a production
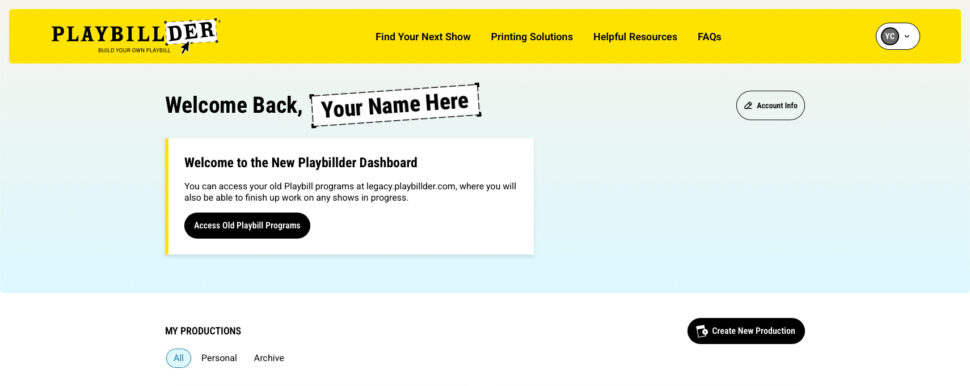
After you log in, you'll be at your Playbillder dashboard. Look for the black "Create New Production" button to get started on a new show program. Follow the helper prompts to fill in any information you have—like the show title, performance venue, etc. And if you don't have things like performance dates and times set yet, don't worry. You can fill in or change those fields later.
Click "Continue to Roles" (or "Start Designing" if you're using a Playbill Express template) at the bottom to continue.
Pro tip: The Playbill Express library offers licensor-approved program information for thousands of the most popular shows, saving you from having to enter character names, song lists, and more. If a drop down appears as you’re typing in your production name, that means your show may be in our Playbill Express library. Click the show title in the drop down to pre-load those templates into your program.
If you're using the pre-filled templates from our Playbill Express library, you can skip to step six below.
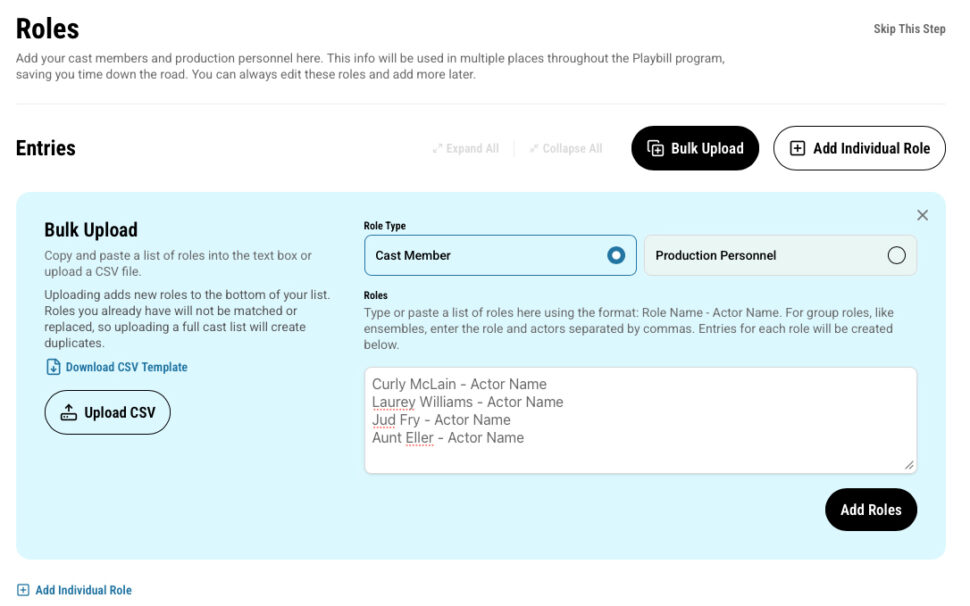
The Role Entry tool, with some example characters from Oklahoma! in the bulk add section
Step 4: Add your cast
Once your production has been created, the first task is to add your cast list via our Roles entry tool. Click "Add Individual Role" to add each Role one by one. Alternatively, you can use our Bulk Upload tool to add an entire cast list at once. Make sure you follow the listed formatting so that everything will be created properly. And don't worry—all of this can be fixed and/or changed later. This section also allows you to add your behind-the-scenes production personnel and creative team. You can also skip this step if you're not ready for it yet.
If you create each Role individually, you'll also have areas to include a bio and a headshot for each artist. These will help populate your Who's Who and Headshot templates later in the program creation process. Think of the "Roles" area of your program as the hub for all of your individual credits regardless of where they're appearing in your program. If you update a name, that name will update everywhere that name appears in your program without your having to edit each individual section.
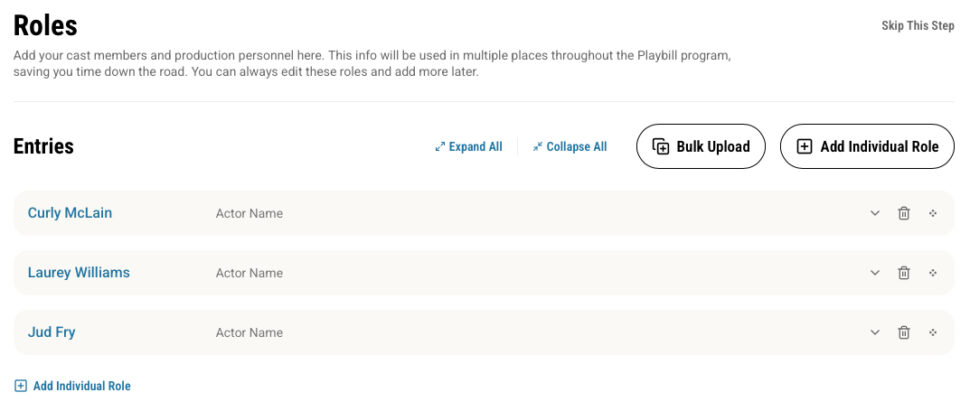
Your Roles will be displayed in the order that you create them, but you can change that order by using dragging the directional icon to the right of the Role.
Click "Continue to Songs/Scenes" to continue when you're done.
Pro tip: Our Roles listing also allows you to list multiple people under one "Role," as often is desired for ensemble groups or multi-member departments in the case of backstage personnel. To add a group listing, simple list each actor name separated by commas in a list following the Role name. There's an example for you in the Bulk Upload tool if you want to use this feature.
Step 5: Add your songs/scenes
If you don't want to include a song and/or scene listing in your program, you can skip this step.
Our tool allows you to list acts, scenes, overtures, and songs in any configuration you'd like. Scenes, overtures, and songs each have to exist within an act. If you want that act to display, you can give it a name in the "Act Name" field. If you just want the scenes, overtures, and songs, leave that field blank.
When adding songs, you can list the characters involved in each number to the right of the song title. If you've already input Roles, Character Names from your cast list will be suggested in a drop-down display as you start typing. Click the name from the drop-down to add it to that song's listing.
If you want to list something here that's not an individual character name in your program, you can add it as a label—use this when you want to "character names" like "Orchestra," "Ensemble," etc. These will be available to you elsewhere in your song/scene list, but won't affect your cast list or who's who bios.
Click the trash icon to the right of any song, scene, or overture listing to remove it from your program. And you can change the order of entered songs by clicking and dragging the directional icon up or down with your mouse.
Click "Save and Start Designing" to continue.
The Playbillder Program Designer
Meet the Program Designer
Now that we have the basic info about the show entered, you'll find yourself in the Program Designer tool, which is where we'll do the bulk of our work. On the left side of your screen, you'll see template cards for each section of your program, and an "Add" button to insert more. If you look to the left of each template card, you'll see a colored line. This will tell you the status of that template. A gray line means no work has been done. A yellow line means work has been done, but it hasn't been marked as complete and made public. A green line means the section has been marked completed and will appear in any public or printed version of your program. Take-away: if you don't see green next to a template card, it will not appear in any public version of your program.

The header of a Playbillder program front cover
Step 6: Front Cover
The section we start at in the Program Designer tool is the Front Cover. First up is the header information, where you decide what goes underneath the Playbill logo. If your header template is set to "Automatic," it'll automatically populate this section with information about your organization or group. Alternatively, you can select "Custom Text" to use this space for whatever you like. Broadway Playbill programs use this area for the venue name where the performance is happening. Like every Playbillder template, this section is fully customizable, so use that space for whatever makes the most sense for your group and production.
Pro tip: If you’re going for a Broadway-authentic look, use the middle of the three possible text lines to list your venue name in all caps, and with two spaces between each word.
Next is the cover artwork, which goes beneath the header. Feel free to use artwork provided by your licensor (many show logo packs include artwork designed specifically for the size specifications of the Playbillder cover template), or any image of your choosing that you have clearance to use. Clicking "Add Image," or dragging an image onto this area, will bring up the image upload tool, where you can add images to be used throughout your program. Once you’ve uploaded an image for your cover, make sure that it is selected (there will be a blue "1" in the upper right hand corner of the image preview) and then click "Set as Cover."
If your image is not designed for our exact size specifications, you have the option to "Fit," "Fill," or "Crop" the image. "Fit" makes sure the full image as uploaded is displayed, with white space added automatically to fill in any left-over space. "Fill" will zoom the image in and automatically crop it to fit. "Crop" allows you to decide which part of the image is visible on your cover.
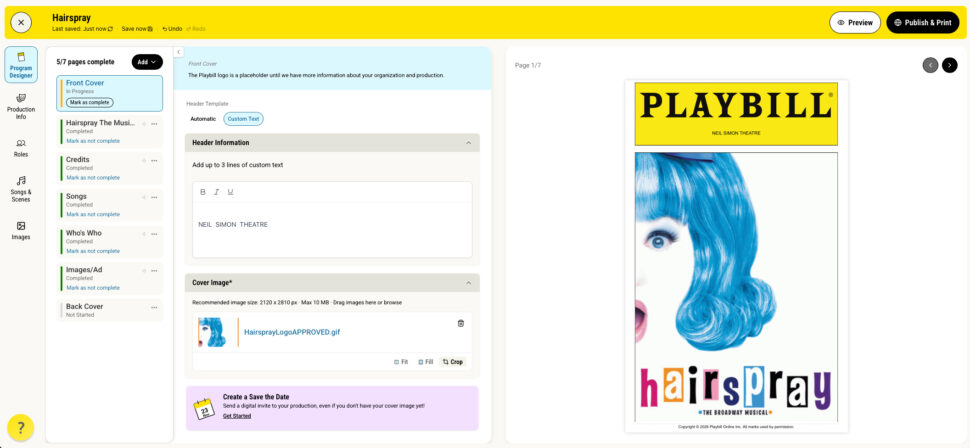
Throughout Playbillder, you'll be able to see what your work looks like as laid out on the page to the right of where you enter in content. If you're happy with how your cover looks, click "Mark as complete" in the Front Cover template card. And don't worry; "complete" is not a forever designation. If you need to make further changes, clicking "Mark as not complete" in the same area will allow you to edit the section again. If you do this, remember to click "Mark as complete" again afterwards, and make sure the template card has a green stripe. Remember: only template cards marked with a green stripe will be included in any public or printed version of your program.
Pro tip: Images should be in JPG, PNG, GIF, or WEBP format, and 10mb or less. Recommended image size is 2120 x 2810 px. Many licensor-provided logo packs include artwork prepared expressly to these specifications.
Step 7: Billing Page
Think of this section like your program’s title page. A Broadway program’s billing page usually begins with the venue name and producers at the top, followed by the show’s title, writers, cast, and creative team. Your program is fully custom, so you can include as much or as little of that as you wish.
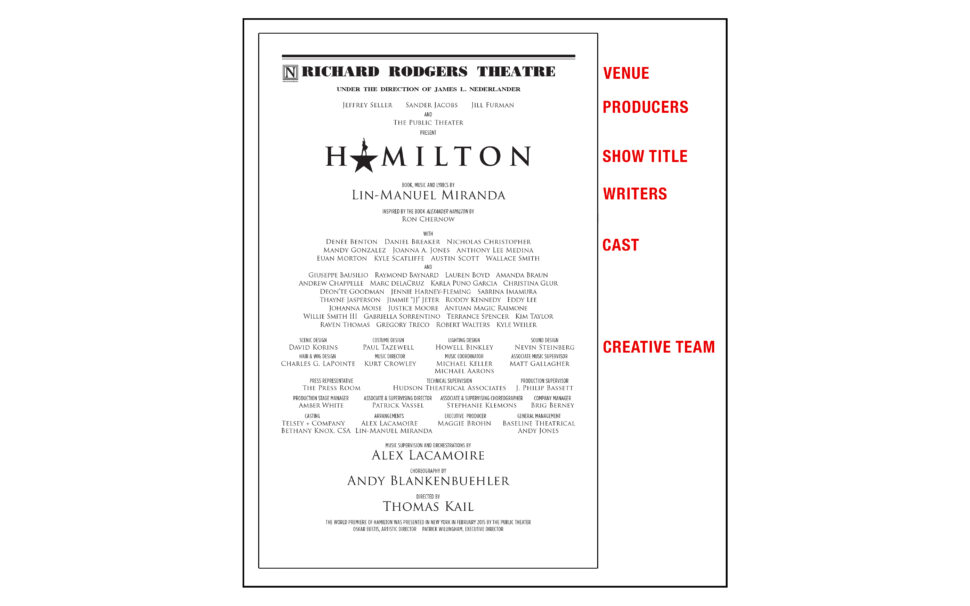
The original Broadway billing page from Hamilton
There are three Billing templates you can choose from: "Automatic," "Musical," or "Custom Text." "Automatic" and "Musical" will use information entered about your production and Roles listings to try and make your Billing page with no further work from anyone else. "Custom" lets you assemble your Billing page from scratch on its own, with the ability to add blocks of text, images, and horizontal spacer lines. The text content block is fairly similar to using a word processor like Microsoft Word or Google Docs, and you can use the table tool—which looks like a grid—to create columns of text, often necessary for Billing pages.
Pro tip: If you’re unsure what to make your billing page look like, head over to Playbill Vault. If your show has played Broadway, its opening night Playbill program is available to look at online.
Step 8: Credits
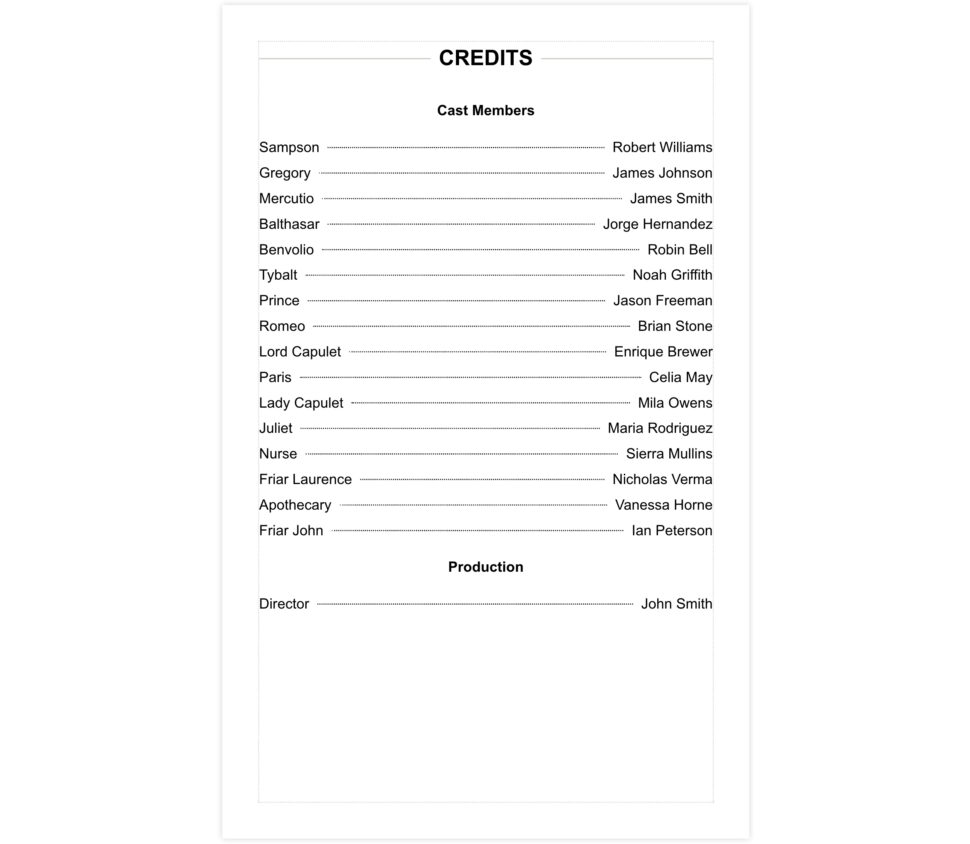
This template is for our cast and crew lists. You'll already have sections of Cast Members, Production Staff (for your backstage crew), and Creative Team (your director, music director, etc.). Anything you entered while creating your production should already be here, but you can add to that from this area as well (re-visit Step 4 above for more about that). Click "Add New Section" at the bottom of this template to add additional blocks of credits. Click "Mark as complete" on the template card when you are finished and want to make the section public.
Pro tip: While working on a program, click "Save now" at the top of your page periodically to make sure you don't lose any work to technical difficulties.
Step 9: Songs
This template is where the song and/or scene listing we created earlier lives. If you're using Playbill Express, this section will be pre-populated with the licensor-approved song list. If you need to make changes, refer to Step 5 above. Click "Mark as complete" on the template card when you are finished and want to make the section public.
Step 10: Who’s Who (artist bios)
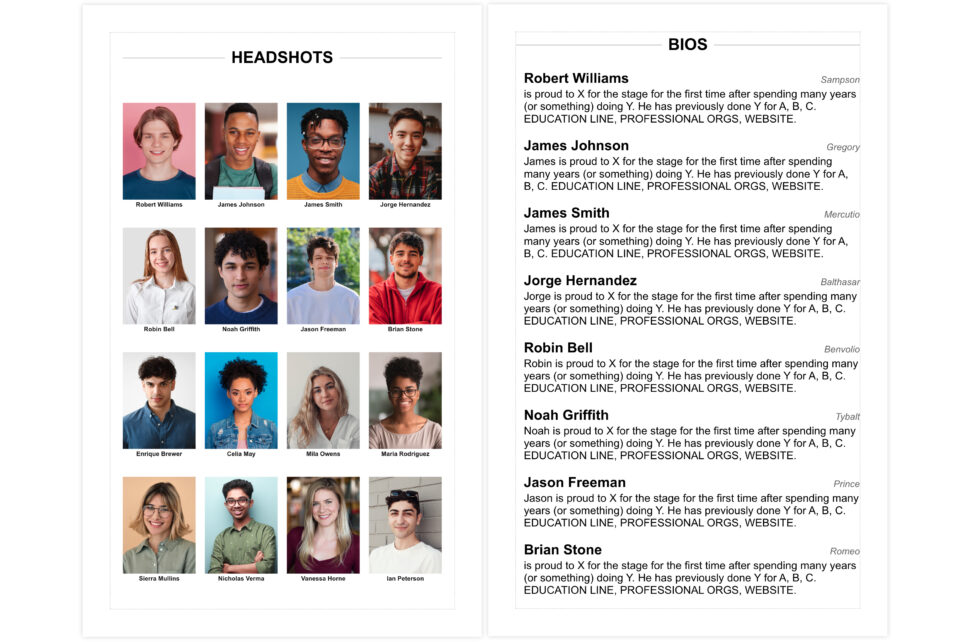
The new Playbillder allows for two kinds of Who's Who and Headshot templates. Your program will default to including artist headshots with their Who's Who bio, as you will see in some professional Playbill programs. You can also use the check boxes at the top of this template to keep headshots on their own headshots-only page, as you'll see in most Broadway Playbill programs.
If you've added your cast and backstage staff via the Roles entry process, you will automatically have a listing for each person to have a bio in your Who's Who section. If you need to add or edit a bio, click into the Role for those areas. When you're editing an individual Role, you also have the ability to choose whether an individual credit appears in your Credits, Headshots, and/or Who's Who templates, so each section includes only the people you want to include.
All sections in your Credits will default to manual order so that you can drag each list into the order you want. If you'd like for Roles to be ordered alphabetically, click the "Manual Order" drop-down for other options.

Various photo and ad templates
Step 11: Photos, Ads, and Back Page
There are three sections in Playbillder meant for including pictures: Photos, Ads, and Back Page. All three use photo upload tools that are similar to what you saw when making your cover. When you start your program, you'll have a Back Cover template already added. If you want to add additional image or ad pages, click the "Add" drop-down above your Template Cards, and then click "+ Images/Ad." Our image and ad templates can accommodate various layouts of 1, 2, 3, 4, or 5+ images. You can include as many pages as you like in whatever layout you'd like. Just add another Images/Ad section to add more pages. For more on uploading images and changing how they display, re-visit Step 6 above.
The Back Page section is exactly like a full page Ad, but it will appear on the program’s back cover.
Pro tip: Selling ad space in your program helps defray production costs while also getting community business leaders involved and invested in the success of your production. Read more here.
Step 12: Acknowledgments, End Notes, and Custom Page
These sections are the most open ended of Playbillder's templates. If you want to include a director’s note, special thanks, or any other kind of extra content, these are the sections to use. Much like the custom Billing template, you'll be able to add blocks of text, images, and horizontal spacer lines. The text content block is fairly similar to using a word processor like Microsoft Word or Google Docs.
Pro tip: You can also use End Notes as your back page. Leave the Back Page section blank, and your End Notes—or whatever published section you have placed last—will become your program’s back page.

Students at Shawnee Mission North High School in Overland Park, Kansas (Courtesy of Shawnee Mission North High School)
Step 13: Publish
When you're ready to share your program publicly, either online or as a printed booklet, click "Publish & Print" at the top right of your screen. You'll be given options to publish digitally, print a poster of your program's cover, or to print your program. If you want to print your program, you'll have two options for doing so. The easiest method is using our Official Playbill Printers, which will see your program printed and assembled in the very same facility where Broadway Playbill programs are printed and assembled.
To print at home, you can purchase a PDF edition of your program that can be printed at any local printing service or even a home printer. And if you catch errors or need to make further changes after you've activated the PDF edition of your program, you can make corrections and re-generate that PDF at no additional cost, and as many times as you need.
Pro tip: If you pay the PDF fee and then choose to use our printing services, you will receive a credit in the amount of your PDF fee that can be applied towards the cost of your print job. Many of our customers purchase a PDF license so that they can print proofreading copies prior to submitting print orders, or for more open-ended digital distribution—a two-for-one.
If you are printing your program using either our Official Playbill Printers or another printing service, you'll need to ensure your finished program has a total page count that is a multiple of four—keep this in mind while creating your program. But if you're having trouble making that happen, our system will automatically add blank autograph pages at the end of your program (before the Back Page template) to save the day.
Pro tip: The Playbill Store offers custom-made frames for Playbillder-created programs and posters.
Need More Help? Playbillder support staff is always standing by to help if you need assistance. Call our live help desk, staffed weekdays 9 AM to 3 PM ET, at 212-557-5757 (ext 167), or email support@playbillder.com.
Ready to start building?
Join thousands of other organizations and make your next production unforgettable.


